This mixing guide looks at five effective methods used to perfectly tune drums in Ableton Live. Learn how to improve your mixes using these various drum tuning techniques.
Why Producers Tune Drums
Tuning drum samples to the key of your music is an essential technique often overlooked in electronic music production. Like any other instrument, many drum sounds also have defined pitches that correspond to notes on the musical scale.
Additionally, drum samples playing out of key with the rest of the song can sound dissonant or jarring to the listener. Conversely, tuned drums sound more pleasing because they harmonize and groove better with other elements in the song. Moreover, tuned drums improve harmonious relationships with basslines, chords, and other melodic parts, as well as makes the mix sound more cohesive.
In addition, drum sounds are often tuned to either the tonic or root, major or minor third, perfect fourth or the perfect fifth. These intervals harmonize the best with the key of the song and other melodic parts. However, not all drum sounds need to be tuned. Use your ears and judgment to determine what sounds best to you.
This mixing guide looks at five drum tuning methods in Ableton Live that will help you develop more professional sounding mixes.
Tune Drums with Tuner
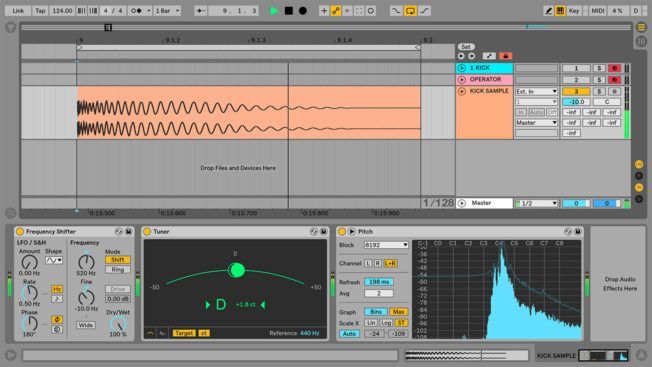
Live’s Tuner device is a handy tool that analyzes and displays the incoming pitch of an audio source. Based on traditional guitar tuners, its large display is perfect for tuning guitars, as well as other instruments and samples.
Tuner works best at analyzing tonal drum sounds such as kicks, toms, congas, and bongos. However, it does not work well with drum sounds that don’t have clearly defined pitches such as claps, hi-hats, and cymbals.
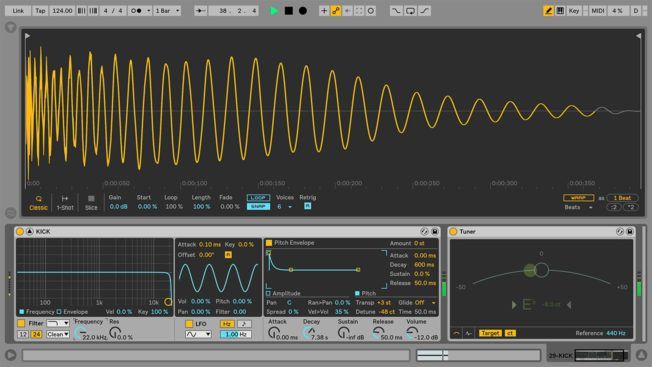
Tuning drums with Tuner is simple. Load the device on either an Audio Track or a MIDI Track with your source material. During playback, the nearest detected note will show on the display along with a colored ball moving around on a curved line. The ball represents incoming pitch changes.
Once you have determined the key of your song, transpose the pitch of your drum sound until the Tuner displays the tonic note or any of the harmonic intervals that sound best to you. For example, if your song is in the key of D minor, then the tonic note will be D.
Also, how you transpose your drum sounds will depend on the how you are playing back the source material. Instruments such as Drum Rack, Simpler, Sampler, and Impulse have Transpose and Detune controls. However, if your dropping audio into either the Arrangement or Session View then you would use the Transpose and Detune controls in Clip View.
Additionally, not all sounds have exact pitches and will require fine-tuning. Make fine adjustments using the Detune control to dial in the tone with more accuracy. Transpose moves the pitch in semitones whereas Detune fine-tunes the pitch in cents.
Tune Drums with Frequency Analyzers
Live’s Spectrum device performs real-time frequency analysis of incoming audio signals. This tool also does an excellent job at finding the root note of drum hits.
Using a frequency analyzer to visually find the root note works better on drum sounds with clearly defined pitches rather than layered sounds.
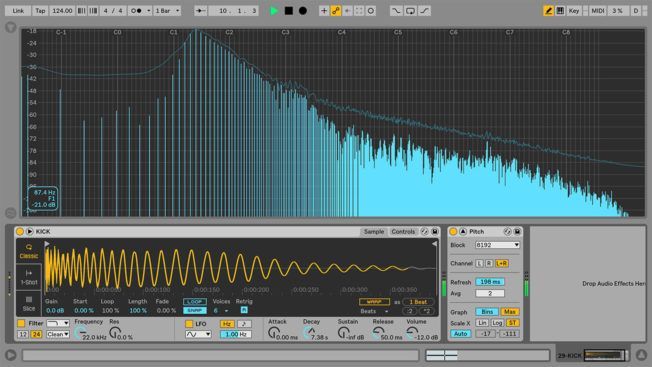
For this technique, load Spectrum on either an Audio Track or a MIDI Track with your source material. During playback, Spectrum will display frequency and peak levels. The loudest peak at the lowest frequency represents the signals ‘fundamental’ frequency which is also the root note of the sound. Moreover, the fundamental frequency is what you want to tune to the key of your song.
When hovering your mouse over the fundamental frequency, a box will appear showing the amplitude, frequency, and corresponding note name. Once you have determined the fundamental, transpose the pitch of your drum sound to the tonic note of your song or any of the harmonic intervals.
For this example, I’m tuning a kick drum. The song is in the key of D minor so I can transpose the kick to the tonic which is D or a 5th (7 semitones) above to A.
The perfect fifth is more consonant, or stable, than any other interval except the unison and the octave. It occurs above the root of all major and minor chords (triads) and their extensions. Wikipedia
Hovering my mouse over the kick drum’s dominant frequency shows the corresponding note as F. I can transpose the kick -3 semitones to D or +4 semitones to A. Transposing the kick up a perfect fifth is a common technique used to create separation between the kick and bass.
Tune Drums with Operator
Matching the pitch of your drum sound to a sine wave is a method that helps you tune drums with your ears instead of your eyes. Moreover, this technique is often more accurate and also helps you train your ears to hear intervals.
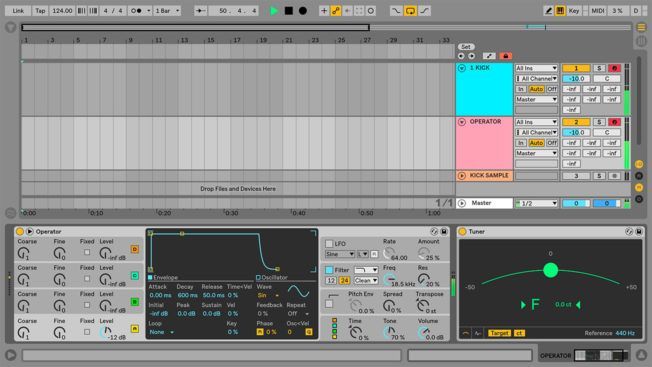
This concept involves triggering a synth playing a sine wave and a drum sound simultaneously. For this example, we’ll use Live’s Operator synth to generate a sine wave.
Create a MIDI Track loaded with Operator and another MIDI Track loaded with your drum sound in either Simpler or Sampler. Next, arm both tracks by holding CMD [Mac] or CTRL [PC] and selecting the Arm Record button on both tracks. Once both tracks are armed, start playing notes to trigger them simultaneously.
Begin tuning the drum sound by transposing the pitch while playing notes until you hear the two tones harmonize. Also, if you find it difficult to hear the pitch of lower frequency sounds, try transposing everything up an octave. Transposing sounds up to higher octaves makes it easier to distinguish the pitch.
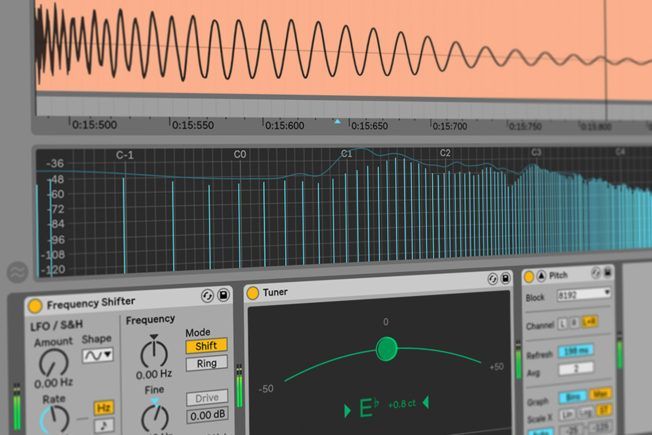
Tune Drums with Frequency Shifter
Sometimes using transposition controls to adjust the pitch will change the character of the drum sound in unrealistic ways. Frequency shifting can be a great alternative to pitch shifting when drum hits are not sounding right.
Pitch shifting alters the incoming signal by musical intervals. This is done by multiplying or dividing all the frequencies within the signal to preserve harmonic relationships. For example, imagine you have an incoming audio signal consisting of saw waves an octave apart at 220 Hz and 440 Hz. Pitch shifting this up an octave would multiply these frequencies by two which is 440 Hz and 880 Hz. This drastic shift in the higher frequencies can make your drum hit sound unnatural or less impactful.
Frequency shifting on the hand moves each frequency by the same amount by adding or subtracting a value in Hertz. For example, shifting the pitch by 50 Hz would transpose every frequency by that amount. This means that the harmonious relationships are broken instead of preserved, resulting in a different sound. This approach works better on some drum sounds because you can tune them while retaining the quality of the original sample.
For this method, load up Live’s Frequency Shifter device in Shift mode with the Dry/Wet amount at 100%. Then adjust the Frequency and Fine controls until you reach your desired pitch. For this example, I’m aiming to transpose a kick sample until its fundamental frequency corresponds to the note D.
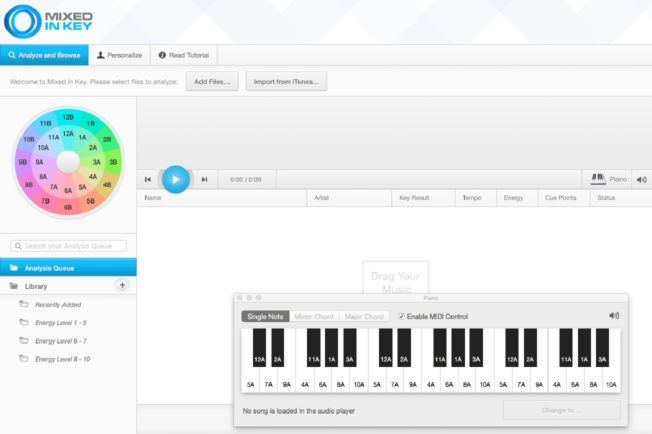
Tune Drums with Mixed in Key
Perhaps a quicker way to determine the root note or key of your drum sounds is to use a pitch detection software such as Mixed in Key. This beneficial software will analyze all your drum samples and rename them with root note or key tags.
This method is much faster and makes it easier to identify a samples root note in Live’s Browser. Labeling your samples improves workflow and helps you work more productively.
Conclusion
Tuning drums is an essential skill to have. Once you become comfortable using these drum tuning methods you’ll realize the impact it will have on your mixes.
Furthermore, transposing a sample up or down by a few cents can have a subtle, but significant influence on how it sounds in the mix. This is especially true if you are working with found or recorded sounds that don’t have clearly defined pitches.
Also, keep in mind that not all drum sounds need tuning. Sometimes it’s okay to leave some dissonance with your drum tuning to create tension or make them stand out in the mix more. So try experimenting with these various tuning methods to hear what works best in your mixes.

Turn your passion for music into a Profession: Learn more about our Music School Programs!
MORE ARTICLES FROM THE ICON BLOG

FIND YOUR SOUND, HONE YOUR CRAFT:
Are you ready to turn music into a career? ICON prepares students to become music producers, composers, performers, recording artists, professional DJs, and entrepreneurs in the entertainment industry. Click below to get information about our award-winning programs: