This guide shows you how to use iZotope ‘s Tonal Balance Control plugin to achieve professional mixes and masters that sound great in any listening environment.
What is Tonal Balance?
Tonal balance describes the relative distribution of energy across the frequency spectrum. The interaction of all the parts of a song contributes to the overall tonal balance. Also known as spectral balance, it is also responsible for the perceived timbre of a mix or sound.
Tonal balance also distinguishes a mix as sounding dark or bright, full or thin, clear or muddy, warm or harsh, and so forth. In other words, tonal balance is key to a great-sounding mix.
Additionally, correcting tonal imbalances in a mix produces a more natural pleasing sound that is more cohesive. Moreover, a tonally balanced mix also has a reasonably consistent frequency response. It also has perceived equal loudness across the frequency spectrum.
Conversely, a mix with poor tonal balance may have noticeable peaks and dips in the frequency response. These inconsistencies either exaggerate or reduce frequency areas. For example, an emphasized low-end or a lacking midrange. Lower frequencies should blend smoothly with higher frequencies.
The best way to control timbral qualities and tone is with equalization. Equalizers and spectrum analyzers are the primary tools for adjusting and monitoring the tonal balance of a mix.
Understanding and managing tonal balance helps you achieve a more professional sounding mix. Moreover, well-balanced mixes will translate better across different speaker systems.
What is Tonal Balance Control?
Tonal Balance Control is a visual analysis tool that comes with iZotope’s Ozone 8 and Neutron 2 Advanced plugins. It enables you to visualize your mix against a reference target, making it easier to resolve tonal balance issues. Tonal Balance Control also provides integrated access to the Equalizer module in Ozone 8 or Neutron 2. This feature allows you to make corrective EQ moves for many tracks all within a single plugin.
Moreover, Tonal Balance Control provides an alternative approach to traditional mix referencing. It compares your mix with reference target curves based on thousands of professional tracks spanning a variety of musical styles. You can also create custom targets by importing one or more songs from your library.
How to Use Tonal Balance Control
Tonal Balance Control listens to the incoming audio and displays spectrum metering information. For accurate results, insert the plugin at the end of the processing chain on your master bus track.
Tonal Balance Control provides two different views to display EQ target curves. These curves represent typical spectral shapes found in different styles of music.
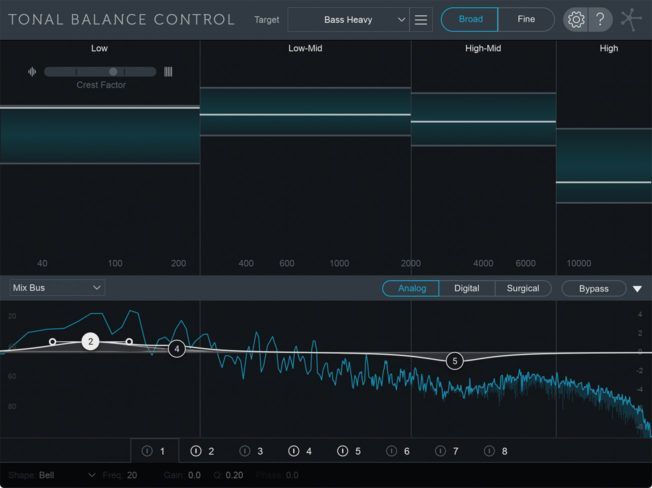
Broad View
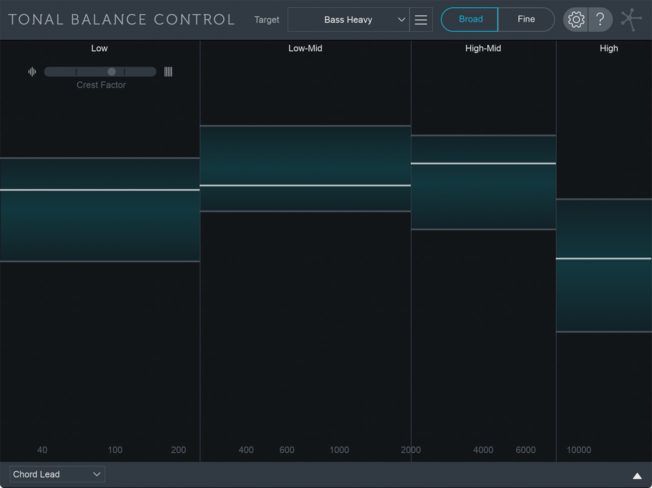
Broad View displays target curve ranges split into the following four frequency bands:
- Low: 20 Hz – 250 Hz
- Low-Mid: 250 Hz – 2 kHz
- Mid: 2kHz – 8 kHz
- High-Mid: 8 kHz – 20 kHz
The blue bars shown in each frequency band represent the target curve range. The white lines show how your track compares to the target curve.
The goal is to make EQ adjustments to any problematic tracks in each frequency range until the white line floats within the target ranges. For example, the white line will sit above the low band range if your mix is bass heavy. To resolve this issue, you could shape your bass or kick with the integrated Ozone or Neutron EQ until the white line falls within the target range.
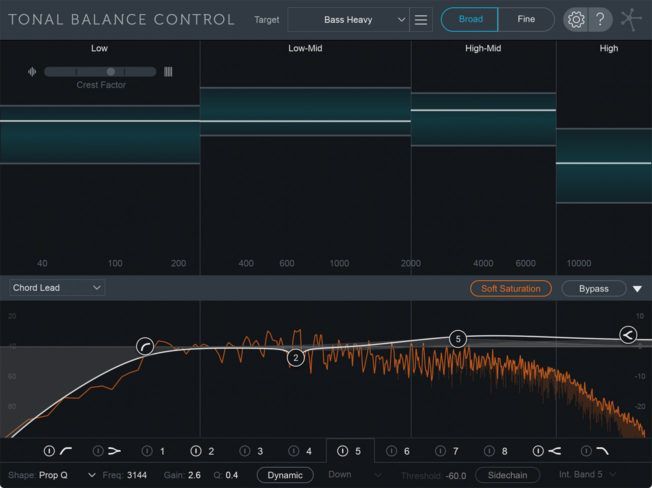
Fine View
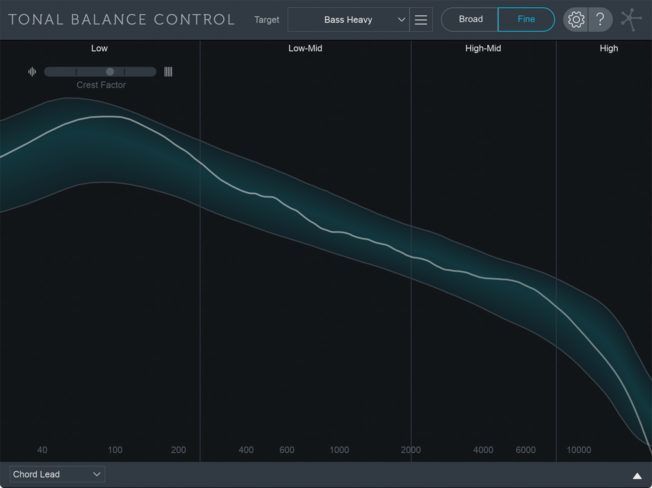
Fine View displays the selected target curve range across the frequency spectrum. The white spectrum curve in this view represents your mix. Again, the goal is to make EQ moves until the white line falls within the target curve.
Target Curves
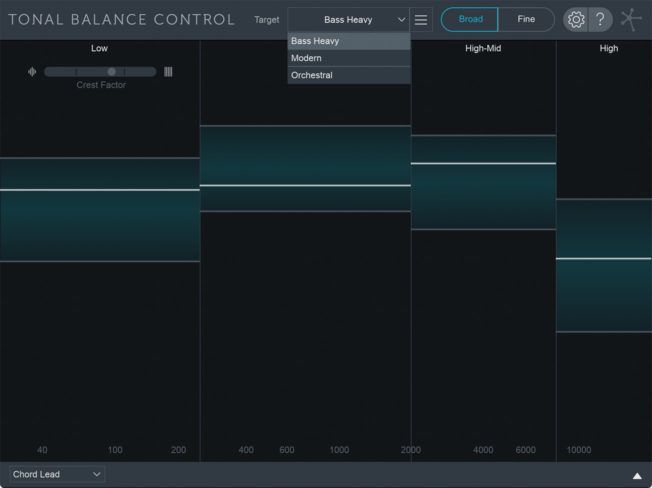
Tonal Balance Control comes with three factory target curves. From the Target Curve menu, select either Orchestral, Bass Heavy, or Modern. These presets represent the typical spectral curves found in each musical style.
Clicking on the button to the right of the Target Curve menu provides options for creating custom target curves. You can import a single song or a folder of songs. Tonal Balance Control will then generate a single composite target curve from the imported songs.
Choose a target curve or create your own to get started. Tonal Balance Control will analyze your mix and show you how it aligns within the ranges.
Crest Factor
The Crest Factor meter displays information about the low-end dynamic range of your mix. When the meter shifts to the left, it indicates that your mix is ‘too dynamic’ in the low-end. When it shifts to the right, it indicates that your mix is ‘too compressed’ in the low-end.
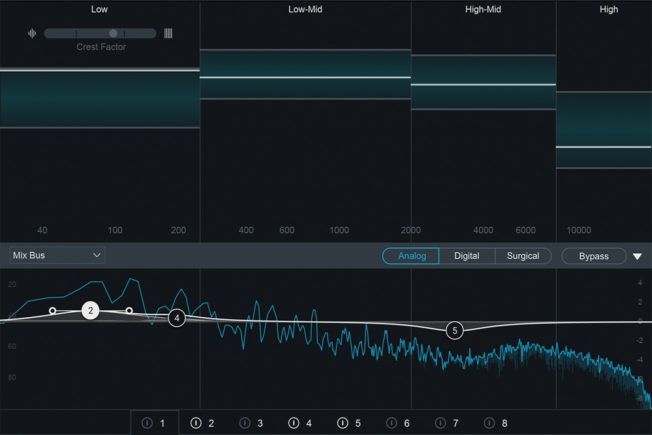
Plugin Integration
Tonal Balance Control supports inter-plugin communication with Neutron 2 and Ozone 8 Equalizers. This helpful feature enables you to fix mix issues for individual tracks directly from the interface.
Insert Neutron 2 or Ozone 8 on individual tracks and then select the EQ to display/control from the Plugin Selection menu. This feature speeds up workflow significantly. No more having to click through several tracks to make EQ edits. Everything is accessible from the Tonal Balance Control interface.
The Wrap Up
Getting your mix or master to sit right across the frequency spectrum is a difficult task. Tonal Balance Control makes this process more achievable for everyone. Its simple workflow makes it easy to deal with tonal balance issues that arise during mixing and mastering. Moreover, this innovative mixing and analysis tool helps you shape a well-balanced mix.
Tonal Balance Control is also an excellent learning tool that will help you develop your critical listening skills. However, this analysis tool is designed to help guide your mixing decisions. It’s only visualizing your music so trust your ears more than your eyes.

Turn your passion for music into a Profession: Learn more about our Music School Programs!
MORE ARTICLES FROM THE ICON BLOG


FIND YOUR SOUND, HONE YOUR CRAFT:
Are you ready to turn music into a career? ICON prepares students to become music producers, composers, performers, recording artists, professional DJs, and entrepreneurs in the entertainment industry. Click below to get information about our award-winning programs: