ICON Instructors Malachi Mott, Paul Laski, Pete Evans, Sam Burke, and BigJerr offer some production tips to help progress your music arrangement.
Music arrangement is the art of taking your musical ideas and laying them out along a timeline to build a final piece of music. When working in Ableton Live , the Arrangement View provides a space to arrange, edit, and finish songs. Moreover, this powerful editing tool lets you combine and arrange MIDI, loops, sound effects, video, and complete pieces of music.
However, finding the path to transform your ideas into a fully arranged song is often one of the hardest parts of creating music. It’s also a question that our instructors often hear from students, and a hurdle they have faced themselves. To help you, we have asked five Icon Instructors for some off-the-cuff advice on music arrangement.
Malachi Mott
Arranging music is simple if you create more parts than necessary before mapping the song out. For every melody, I have three alternate ones. For every drum part, I have three grooves that can replace it. For every pad, I have three chordal elements printed and ready to go.
When it’s time for me to arrange the song, it’s more like putting IKEA furniture together than it is like writing a story from scratch. As long as every part is cool enough to be soloed for 8 bars AND it works well with all of the other parts, then you only have to make sure that no two sections have the same elements while creating peaks and valleys in energy.
Paul Laski | P-Lask
If you’re using Ableton Live, make use of the Session View! It amazes me how few Live users (even veterans), ignore it. If you’re stuck with an 8 bar loop idea, try moving all your clips from Arrangement View into Session View. You can do this easily by making a time selection in the arrangement and selecting “Consolidate Time to New Scene” from the “Create” menu. Once the clips are all in Session View on their respective tracks, mute or delete all clips in the Arrangement View.
Experiment by playing one clip at a time, then mixing it with other clips one-by-one in your session. Listen to different combinations of your ideas. If two or three clips work well together, turn them into a Scene and label it (e.g., Intro, Verse, Drop, etc.). This approach can also be done quickly using the “Capture and Insert Scene” command from that “Create” menu. Then continue to set up Scenes to build a rough sketch for your eventual arrangement.
Pete Evans | Petey Clicks

If you want to solo out a vocal or sound in Ableton Live before a drop in your arrangement, use this super useful hotkey combination:
- Select the vocal or sound clips you want to solo in Arrangement View
- CMD+L to set the loop bracket around your selection
- Shift+CMD+L to select that area on all tracks
- CMD+E to split all clips inside the selection
- Click the ‘0’ key to deactivate all the selected clips
- Select only the vocal or sound clip you want to solo and activate it with the ‘0’ key
Sam Burke | Cozmoe

Identify what has worked best for you in the past. For me, I have identified that my strengths are keys and guitar. When I try to make a track without a MIDI controller or guitar, I rarely finish a song. These days I always try to get hands-on by recording at least one real part instead of just penciling in MIDI with my QWERTY keyboard or manipulating audio with my mouse.
Jerry Diphillippo | BigJerr

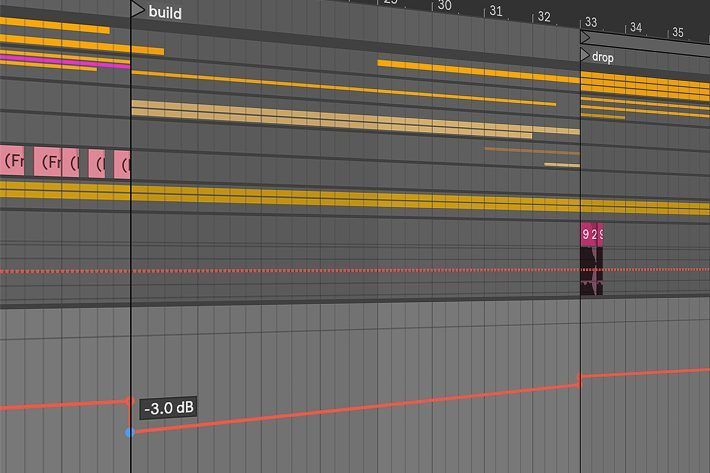
To create more of an impactful drop we need to create a bit of push and pull. Something can only sound LOUD next to something quiet. To create that effect we need to reduce volume without the listener realizing.
To do this, make a 2 or 3 dB reduction right as the build happens. If the volume drop is “noticeable” then simply increase the volume of your impact effect on the first beat of the build. Next, begin to ramp the volume back up till it reaches -1 dB. Finally, turn the volume all the way back up at the first beat of the drop to melt faces!

Turn your passion for music into a Profession: Learn more about our Music School Programs!
MORE ARTICLES FROM THE ICON BLOG

FIND YOUR SOUND, HONE YOUR CRAFT:
Are you ready to turn music into a career? ICON prepares students to become music producers, composers, performers, recording artists, professional DJs, and entrepreneurs in the entertainment industry. Click below to get information about our award-winning programs: