What is a De-esser? Learn how de-essing can reduce or remove harsh high frequencies from vocal recordings, instruments, and entire mixes.
What is a De-Esser?
De-essers are specialized compressors that focus on a specific frequency range. They use a combination of multiband equalization and sidechain compression to reduce harsh high frequencies and sibilance.
De-esser plugins are typically used for vocal mixing. They are the most preferred mixing tool for dealing with sibilance in the mix. However, these versatile devices have other mixing or mastering purposes. For example, de-essers work great at taming cymbals, hi-hats, synths, keys, guitars, and more. Anything with high-end harshness can benefit from a de-esser.
De-essing is also an excellent alternative to traditional EQing when controlling harshness. The ability to control a specific range of unpleasant high frequencies is more transparent and natural sounding.
What is Sibilance?
Vocal recordings often have a tonal harshness called sibilance. Sibilance is the “ess, ch, or ts” sounds created by sharp consonants such as S, T, and Z. These consonant sounds can produce harsh resonant peaks in vocal recordings anywhere between 2 kHz – 10 kHz, depending on the voice. Various musical instruments and percussion sounds can also create unpleasant high frequencies.
Vocal sibilance can also result from:
- A singer who has a naturally sibilant voice
- Recording a vocal in a poor acoustic environment
- Over compressing or incorrectly compressing a vocal
- Using the wrong microphone or bad microphone placement
- Over boosting frequencies with an equalizer that cause sibilance
Unpleasant sibilance can be irritating to the ear, especially with earbuds or headphones. The best way to reduce these annoying high-frequency sounds is with a de-esser plugin.
How De-Essing Works
De-essing temporarily reduces the level of a specified frequency range when a sibilant sound exceeds a set threshold. This method of controlling frequencies often works better than using an EQ to cut those problematic frequencies.
For example, a static EQ will continuously cut frequencies in the vocal, even when there is no sibilance occurring. Conversely, the dynamic response of a de-esser only tames the harsh frequencies when needed. The result is more transparent and natural sounding.
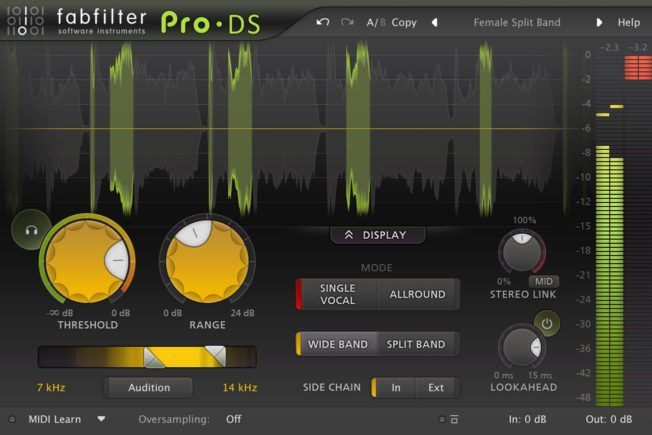
There are several de-esser plugins with different options. However, most have similar controls to set the frequency range, threshold, amount of attenuation, sidechain filtering, and volume. Many de-essers such as the FabFilter Pro-DS also offer two separate compression modes:
Wide-Band: Lowers the entire audio signal when sibilance is detected. Wide-band mode works best with a single vocal recording. It sounds smooth and more natural than split-band processing.
Split-Band: Uses high-pass sidechain filtering to split the signal into high and low frequency bands. Only the high frequencies get attenuated when sibilance is detected. The lower band remains untouched. Split-band mode also works best for de-essing full mixes, bus groups, or complex audio material.
How to Use a De-Esser
These basic steps will help you set up a de-esser and find a starting point:
- Insert a de-esser on the track you’re treating. Placing the de-esser towards the end or beginning of the effects chain is most common (or both).
- Listen for unpleasant sibilance . Set the sidechain frequency range to isolate the problematic area. Harsh vocal frequencies can occur anywhere between 8 kHz – 10 kHz.
- Adjust the threshold to set the level where attenuation takes place. The de-esser should only activate when sibilance exceeds the threshold. If it activates when sibilance is not occurring, your threshold is too low.
- Set the range to determine the amount of de-essing. The range control scales the detected gain reduction so it stays within the desired range. Somewhere between 3 dB – 10 dB of gain reduction works well. It depends on the amount of sibilance occurring.
- Choose either wide-band or split-band mode if these options are available. Also, toggle between the two to hear which mode sounds best.
Note: A de-esser plugin may also have other controls. For example, a monitor switch for listening to the sidechain signal, lookahead, stereo linking, and other advanced features.
5 Alternative De-Essing Techniques
De-essing is an excellent technique for treating vocals and taming annoying sibilant sounds. However, de-essing can also work great for rounding off harsh high frequencies on instrument tracks, drums, bus groups, or even entire mixes. Here are five examples of how de-essing can help other elements in the mix:
1. Taming Harsh Percussion Brightness
Cymbals, hi-hats, rides, and other high-frequency percussion can often sound harsh. Using split-band de-essing will tame any harsh spikes without affecting lower drum sounds like the kick or toms.
2. Reducing Harsh Synth Brightness
Digital synthesizers can often sound too bright in the high end. Especially when processing the signal with various effects. For example, those shrill dubstep basses and leads. De-essing will help tame harsh high-frequency spikes and smooth out the signal.
3. Reducing Guitar Harshness
Compressing a guitar recording can amplify fret and string noise. A split-band de-esser works great at attenuating fret and string noise without affecting the overall tone.
Moreover, electric guitars can often have harsh sounding frequencies. A wide-band de-esser can help smooth the signal and tame unpleasant harshness only when it occurs.
4. Mastering with a De-Esser
Inserting a de-esser on the stereo mix during the mastering process is another common technique. Mastering engineers will often use a combination of de-essing and EQ work to tackle excessive top-end brightness.
5. De-Essing Audio Effects
Insert a de-esser plugin before audio effects like reverb, delay, and distortion to smooth out the signal before it gets processed. These effects can amplify sibilance and introduce harshness. Placing a de-esser before these processes can help mitigate some of the unintended side effects.
Conclusion
Learning how to use a de-esser will expand your mixing tool kit. De-essing has an array of uses that can help you achieve better sounding mixes.
Try these techniques in your projects and experiment with the different ways to use a de-esser. Also, remember to use a combination of processes instead of relying on a single plugin or technique to do all the work. And most important, Use your ears!

Turn your passion for music into a Profession: Learn more about our Music School Programs!
MORE ARTICLES FROM THE ICON BLOG


FIND YOUR SOUND, HONE YOUR CRAFT:
Are you ready to turn music into a career? ICON prepares students to become music producers, composers, performers, recording artists, professional DJs, and entrepreneurs in the entertainment industry. Click below to get information about our award-winning programs: