What is bass layering? This guide outlines effective techniques on how to layer bass tracks in Ableton Live. Learn how layering bass will make your basslines sound more powerful, full, and present in the mix.
What is Sound Layering?
Layering is an essential technique that involves combining multiple sound timbres to create a bigger, more present sound. Moreover, layering samples and instruments add depth, texture, and character. Layered sounds also sound much more fuller and exciting than single sound sources.
However, stacking multiple sounds together without proper sound selection and processing can produce undesired results. Effective sound layering involves choosing different timbres that work well with each other without causing frequency masking, phase cancellation, headroom loss, and other mix issues. It’s also important to select sounds that fill out the frequency spectrum. Furthermore, great sounding layer groups are mixed and processed together to create a vibrant, cohesive sound.
How to Layer Bass
Effective bass layering involves more than just stacking sounds. Creating great-sounding layered basslines involves finding complimentary timbres, adding separation, and processing everything together.
1. Complimentary Timbres
Timbre refers to the characteristic of a sound. In simple terms, it’s what distinguishes sounds from each other, even when they have the same pitch and loudness.
Each timbral layer reinforces the overall composite bass sound. Find sounds that work well with each other but are not the same. Identical or similar sounds cause mix issues and make everything louder rather than fuller. Conversely, using sounds that are overcomplex and vastly different may also create conflicts as well as make it harder to mix them. Also, use sounds that fill the stereo field. For example, instead of using a combination of low-frequency sounds, try a mixture of low, mid, and high tones. Overall, use sounds having unique characteristics that compliment each other.
2. Separation
Stacking sounds without some form of separation will cause mix issues and even make your bass sound bad or less impactful. The goal is to create a cohesive sound of unique bass layers that occupy separate frequency ranges across the stereo field.
Additionally, bass layering presents challenges, especially if you’re using the same notes for each layer. Separation is necessary to prevent phase cancellation, frequency masking, headroom problems, and clarity issues.
Moreover, separation is achieved in various ways. For example, you can create separation with equalization, pitch, width, volume, and effects processing.
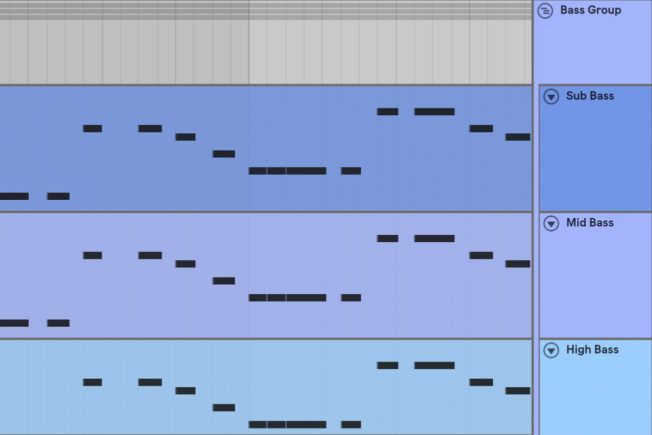
With this in mind, start by creating individual tracks for each bass layer. Layered bass consists of two or more separate layers that fill out the frequency spectrum. There is often a sub bass layer, mid layer, high layer, and sometimes a percussive layer. For example:
Sub Bass Layering
No bassline is complete without sub bass. This layer reinforces the main bass and provides the foundation for the low end.
The Sub bass layer ranges anywhere between 20 Hz and 200 Hz. It plays the lowest fundamental frequency and is often ‘felt’ more than heard on big speaker systems. The frequency range you place your sub in depends on the song and your personal preference.
The fastest way to create this layer is to duplicate your main bass and then pitch the notes or oscillators down an octave. Also, sub bass commonly plays a sine wave because it produces a pure tone that works best for ultra frequencies. However, you can use other waveforms such as square, triangle, and sawtooth if more character is needed to cut through the mix.
Moreover, controlling your sub frequencies is crucial to achieving punch, presence, and clarity in the overall mix. For best results, ensure the sub bass is mono and cut any unnecessary frequencies. In most cases, removing ultra-low frequencies will make you sub bass sound louder.
Bonus Tip: Smaller speaker systems are not capable of reproducing sub frequencies. For this reason, try duplicating your sub bass, pitch the notes up an octave, and high pass anywhere below 150 Hz. Adding some saturation or distortion will also help it cut through the mix.
Mid Bass Layering
The main bass layer ranges anywhere between 100 Hz and 500 Hz. It provides the central warmth and presence that drives your bassline. This layer also adds most of the bass character and richness.
To make this layer sound fat and wide, try applying saturation to add more harmonics, some subtle reverb to give it depth and space, and a bit of stereo width. You can also treat this layer with additional effects to shape the tone and control dynamics as needed. Since this layer occupies the midrange, it is also critical to remove any frequencies conflicting with other elements that occupy this space in the mix.
High Bass Layering
The high bass layer ranges anywhere between 500 Hz and 2000 Hz. It reinforces the main bass by adding even more character and vibrance. This layer also adds upper harmonics that gives the bass presence and helps it cut through the mix.
The quickest way to create this layer is to duplicate the mid bass layer and then pitch the notes up and octave. You can also process the current sound differently or swap it out with something different and then apply any processing if needed. Saturation, stereo width, and subtle reverb often help bring this layer alive.
Percussion Layering
Adding a percussive layer is another approach that helps beef up basslines. For example, layering a kick drum or something with a transient attack will add punch and help the bass cut through the mix.
3. Effects Processing
Treating the bass layers with various effects is key to shaping the tone, fixing any mix issues, and making the overall sound more powerful. This step involves processing each independent layer as well as combined layers in a group bus.
Moreover, treating each layer independently gives you more control and flexibility then mixing one bass sound that is not layered. For example, you can divide each layer into separate frequency ranges with an EQ, mono the sub while adding stereo width to another layer, and apply any necessary effects without affecting the other layers.
Lastly, combining each layer in a group and processing them all together is essential to creating a unified, cohesive sound. This final treatment gels the layers together and adds additional flavor to make your bassline sound massive.

Turn your passion for music into a Profession: Learn more about our Music School Programs!
MORE ARTICLES FROM THE ICON BLOG


FIND YOUR SOUND, HONE YOUR CRAFT:
Are you ready to turn music into a career? ICON prepares students to become music producers, composers, performers, recording artists, professional DJs, and entrepreneurs in the entertainment industry. Click below to get information about our award-winning programs: