This guide examines five creative techniques used for adding rhythmic variation to repetitive sounding loop sequences in Ableton Live.
How to Add Variation to Loops in Ableton Live
Repetitive loop sequences tend to sound stagnant over time. It’s essential to keep your listeners interested. One of the easiest ways to make your music more engaging is to inject variation. In this guide , we look at five quick and easy techniques for adding more variation to various types of loops.
Triggering Follow Actions
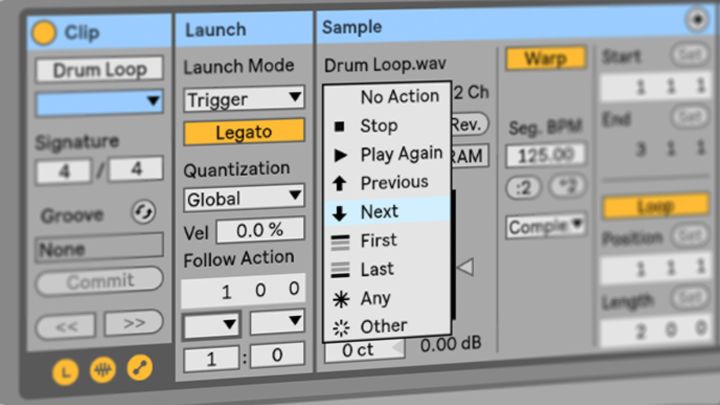
Live’s Follow Actions feature and Legato Mode are excellent options for randomly generating new sequences or creating variations. These two controls are available from the Launch box in Clip View.
Clips arranged in successive slots on the same track can be automatically triggered in various ways using eight different Follow Actions. A clip’s Follow Action defines what happens to other clips on the same track after the clip plays. Also, you can set clips to trigger each other in an orderly or random way to generate exciting new musical ideas.
Legato Mode is an additional setting that controls the playback position for each clip triggered by a Follow Action. Clips launched in Legato Mode will continue to play from the same position as the previous clip without ever losing sync. For example, if a clips playback position is at bar 2, the next clip triggered by the Follow Action will begin playing at bar 2.
This technique works great for quickly adding variation and creating interesting combinations that would often take a long time to program manually. For example, use Follow Actions to randomly trigger similar clips with different envelopes, effects or transposition settings. This method adds subtle differences that sound more intriguing. Furthermore, using Follow Actions and Legato Mode together provides an effective way of mixing up a melody or beat. For example, you can momentarily play alternative loops in sync without losing rhythm similar to a scratch DJ when beat juggling.
Looping Odd-Numbered Bars
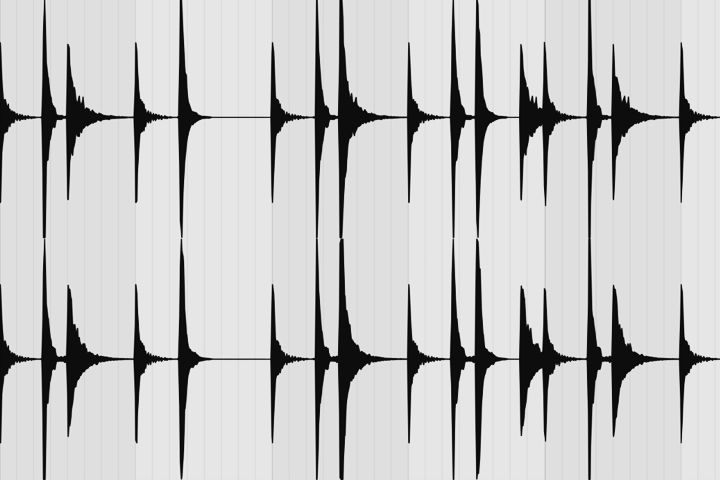
Repetitive loops can often sound monotonous over time. One way to remedy repetitious sequences is to arrange loops with odd-numbered bars. For example, try cropping a loop to three, five or seven bars long to make the rhythm sound less repetitive. Arranging loops with odd-numbered bars causes the hits to play back at different times rather on the same beat every time. This technique also makes the sequence sound less predictable.
Resequencing Audio
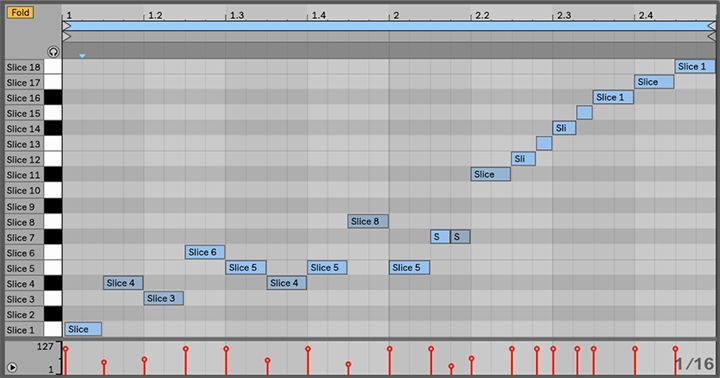
Ableton Live offers four helpful commands that allow you to convert audio to MIDI. Live’s audio to MIDI conversion technology is perfect for quickly slicing up audio loops to a new MIDI track for editing. This technique makes it easier to resequence the slices to create variations or new musical ideas.
The conversion commands that slice audio to a Drum Rack are ‘Slice to New MIDI Track’ and ‘Convert Drums to New MIDI Track.’ However, the ‘Slice to New MIDI Track’ command is the only one that plays back original sounds. The Harmony and Melody Convert commands are much different. They generate a MIDI clip with an Instrument Rack that does not play the original sound. These Convert commands are intended for extracting only the notes and using them to play an entirely different sound. All four commands are available from the context menu when the right-clicking (PC) or CTRL-clicking (Mac) a clip.
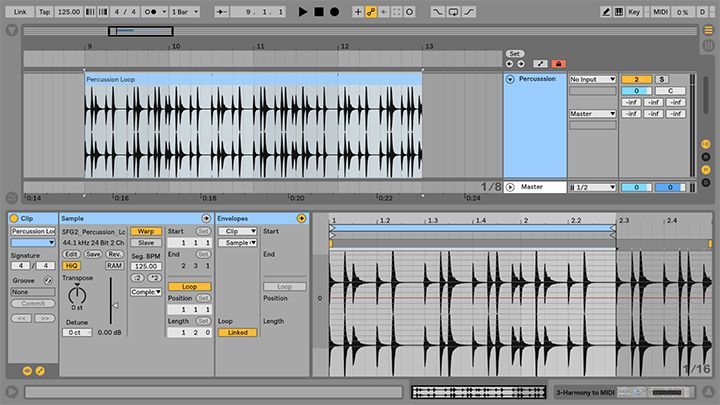
Furthermore, clips placed along the timeline in Arrangement View can also be sliced up and rearranged manually. Simply select a portion of a clip and drag it to a new position. Take your arrangements further by warping the audio, reversing notes or hits, transposing, applying fades, creating envelopes, and automating various effects or parameters. There are several creative possibilities.
Using Clip Envelopes
Clip envelopes are great for automating or modulating device and mixer controls within a clip. Every clip in Live has its own editable, non-destructive clip envelopes. They can influence anything from MIDI controller data to sculpting melodies and rhythms. Access audio and MIDI clip envelopes from the Envelopes box in Clip View. The Envelopes box contains two choosers for selecting an envelope to view or edit. Also, envelopes are drawn in or recorded using the same methods as editing automation in the Arrangement View.
This technique is extremely effective for adding variation too loops. For example, use audio clip envelopes to change the pitch of individual notes in the sample, correct the tuning of notes, pan parts of a loop, mute or attenuate notes, and more. Furthermore, you could modulate various controls on effect device such a filters frequency to create subtle tone difference between clips.
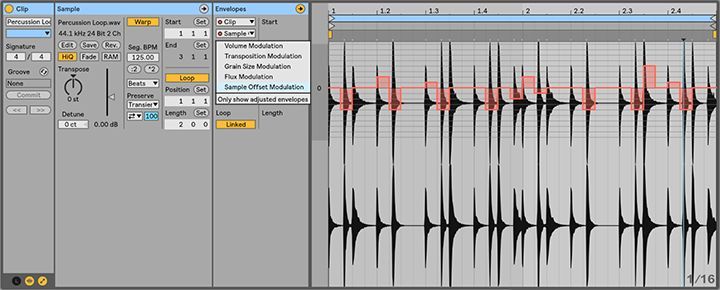
Another very creative use of clip envelopes is to modulate the sample offset. Sample offset modulation works great for rhythmical samples like drum and percussion loops. Available from the Envelopes box, Sample Offset Modulation temporarily shifts the playback position within the clip forwards or backward in time. This feature mimics the behavior of adjusting the position of tape heads. Higher values speed up the audio while lower values slow down the audio. Note, Sample Offset Modulation will only work in Beats Mode.
Applying Effects
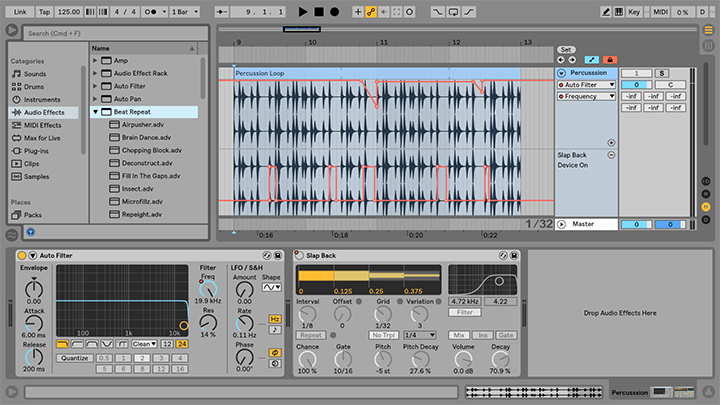
There are several types of plugins and techniques for using effects to add variation to loops. Audio effects like Live’s Beat Repeat device is a great tool for creating controlled or randomized repetitions and stuttering effects to the incoming signal. Filters, delays, modulation, and spatial effects work wonders as well.
In addition, MIDI effects such as Live’s Arpeggiator, Random, and Velocity devices are effective at manipulating MIDI notes to create variation. For example, Arpeggiator excels at creating different rhythmical patterns or altering sequences in various ways. Whereas, Live’s Random device adds an element of the unknown to incoming note pitches. This device works well when paired with Arpeggiator to create entirely new sequences. Finally, the Velocity device is a helpful tool for influencing MIDI note velocities. This device is great for humanizing loops and making them sound less static.

Turn your passion for music into a Profession: Learn more about our Music School Programs!
Join our Newsletter
Get the the latest music industry insights, invites to exclusive events and workshops, and artist spotlights straight in your email.
MORE ARTICLES FROM THE ICON BLOG


FIND YOUR SOUND, HONE YOUR CRAFT:
Are you ready to turn music into a career? ICON prepares students to become music producers, composers, performers, recording artists, professional DJs, and entrepreneurs in the entertainment industry. Click below to get information about our award-winning programs: