This guide discusses dynamic equalization and takes you through the process of using Live’s native devices to mix your kick and bass with dynamic EQing.
What Are Dynamic EQ’s
Dynamic EQ’s are advanced equalizers that combine the precision of parametric equalization with the dynamic control of compression or expansion. This versatile combination gives you more control over shaping and enhancing sounds.
What are the major differences between parametric and dynamic equalizers? Parametric equalizers are linear processors, meaning they treat the incoming audio continuously. For example, cuts or boosts of the filters are static and will process the audio consistently, unless they are manually changed or automated.
Dynamic equalizers, on the other hand, are nonlinear processors that react to either the internal audio source or triggered by a sidechain input source. For example, cuts and boosts respond dynamically, driven by the incoming audio that passes a set threshold level.
Most dynamic equalizer plugins also provide additional functionality commonly found on compressors such as threshold, attack, and release controls.
Working with Dynamic EQ’s
Dynamic EQing is used to treat a broad range of material for various reasons. Dynamic EQ’s work great on individual tracks or busses to give your mix some overall treatment.
Apply dynamic equalization whenever you want to automatically boost or cut specific frequency ranges at appropriate times. For example, dynamic EQing is an excellent alternative to sidechain compression. This commonly used method works great for fixing clarity issues caused by two or more elements in a mix occupying the same frequency range such as the kick and bass. The conflicting low frequencies cause the kick to lose punch and introduces headroom problems.
One way to approach this issue is to cut the problematic frequencies from the bass to create room for the kick. However, cutting a notch in the bass to allow the kick to punch through the mix more clearly will affect the sound of the bass continuously throughout the song. You could automate the EQ filter to stop cutting the bass when the kick is not playing, or you can allow a dynamic EQ do the work for you. For example, you could set the specific frequency you wish to cut from the bass and then use the kick as a sidechain trigger too quickly attenuate that frequency from the bass whenever the kick plays.
Yes, this technique works similar to sidechain compression. However, the biggest difference is that dynamic equalization gives you more accurate control over the frequencies you’re cutting. Sidechain compression attenuates the overall volume of the sound being sidechained. Whereas dynamic equalization just attenuates the problematic frequencies, which sounds more musical and natural.
Dynamic EQing with Live Devices
There is a heap of impressive third-party dynamic equalizers on the market such as iZotope’s Neutron or Ozone 7 , the Brainworx bx_dynEQ V2 , and Waves F6 Floating-Band Dynamic EQ. However, these plugins can be expensive.

The following steps walk you through the process of using Live’s native devices to mix your kick and bass with dynamic equalization.
- Load Live’s EQ Eight on your bass track.
- Group EQ Eight into an Audio Effect Rack by selecting it and clicking CMD+G [MAC] or CTRL+G [PC].
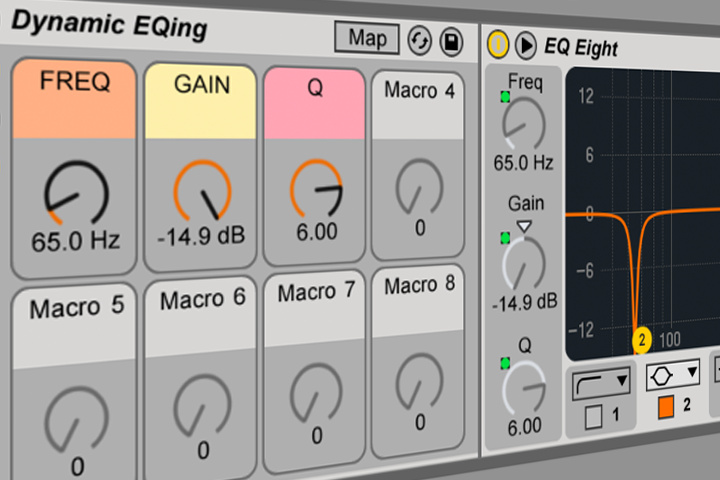
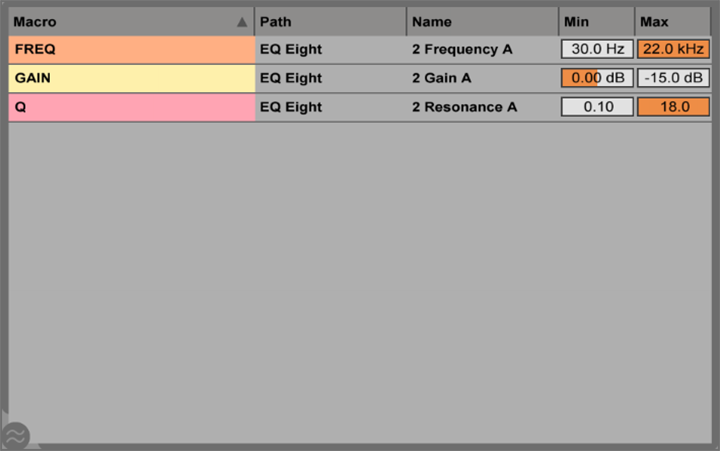
- Macro Map the Frequency, Gain, and Filter Q knobs for the filter node you wish to dynamically control.
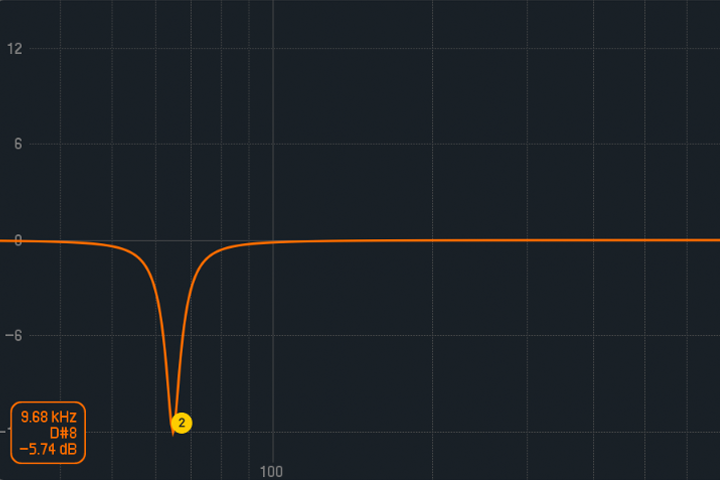
- Set the frequency range you want to cut from the bass. This range is typically the kicks peak frequency. Next, adjust the Filter Q to taste. Narrow cuts typically sound more natural than wider cuts. Broad cuts can cause the sound to lose power and punch.
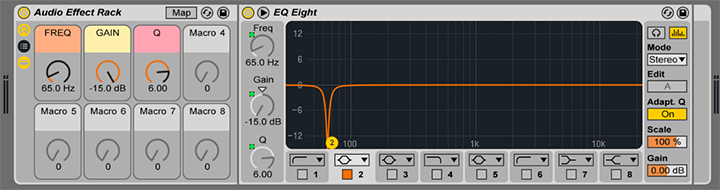
- Toggle the racks Macro Map Mode switch and adjust the EQ Eight’s Gain minimum setting to ‘0.00 dB’ and maximum to ‘-15.0 dB.’ These settings force the EQ to cut at a maximum amount and not boost past ‘0 dB.’ Adjust the minimum amount to fit your needs.
- Create a new audio track. Toggle the tracks In/Out Section and choose your kick track from the Input Channel chooser. Next, select the ‘In’ Monitoring input to accept the incoming signal from the kick track. This track will function as an aux track for routing audio.
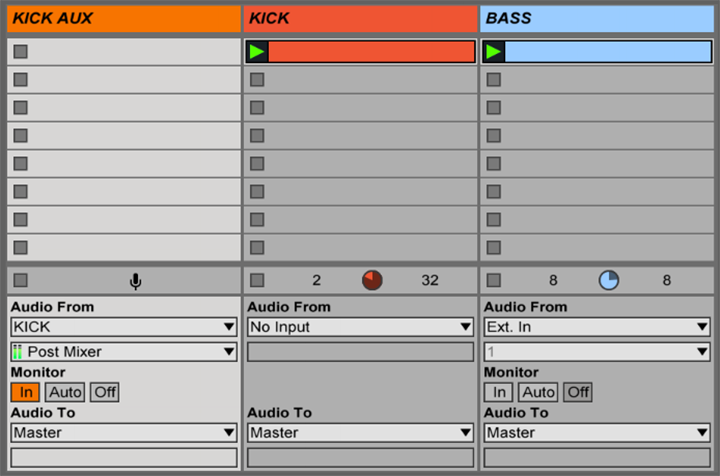
- Load Live’s EQ Three and the Max for Live Envelope Follower device to the new aux track. Use EQ Three to emphasize the frequency range that controls how quickly the dynamic EQ responds to the incoming signal. For example, boosting mid frequency ranges will make the dynamic EQ react much faster than lower frequencies. Envelope Follower captures changes in the volume of an incoming kick signal and uses this information to modulate a mapped parameter.
- Adjust the Envelope Follower’s Gain control to increase the incoming signal if it is low.
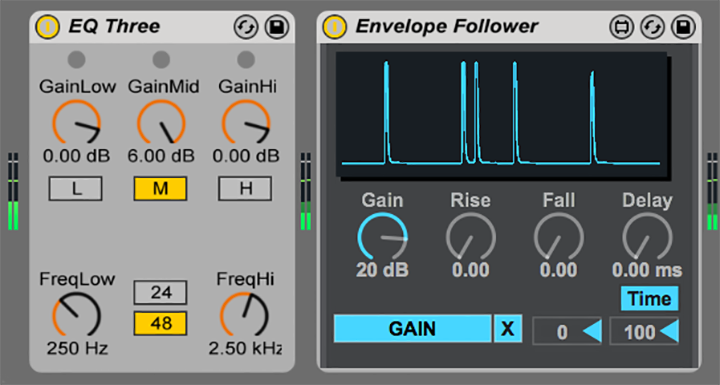
- Click ‘Map’ on Envelope Follower. Then navigate to the bass track and click the Gain Macro control to complete the mapping.
- Hit play and watch the magic happen.
*Note: Alternatively, you can load Envelope Follower directly on the kick track and not use an aux track. However, this method is less flexible than using an aux track and doesn’t allow you to control the frequency ranges that drive the dynamic EQ.
Further Concepts
The methods outlined above are just one example of using Live’s extensive features to treat sounds. They are not limited to mixing kick and bass.
Try experimenting with the concept of routing audio and using Envelope Follower to control various parameters in creative ways. For example, invert the behavior so that the filters react more like an expander. This method will boost a sounds transients to add more punch.
Also, follow the same steps for creating aux tracks and routing audio to set up external sidechaining with third-party plugins. The Input Type will be your sidechain source, the Output Type will be the track you want to sidechain, and the Output Channel will be your third-party plugin.
Turn your passion for music into a Profession: Learn more about our Music School Programs!
MORE ARTICLES FROM THE ICON BLOG

FIND YOUR SOUND, HONE YOUR CRAFT:
Are you ready to turn music into a career? ICON prepares students to become music producers, composers, performers, recording artists, professional DJs, and entrepreneurs in the entertainment industry. Click below to get information about our award-winning programs: