What are Drum Racks? This Ableton Live tutorial introduces the Drum Rack and shows you how to create drum kits. Plus bonus workflow tips to advance your beat making skills.
Introducing Drum Racks
Ableton Live comes equipped with two different drum instruments: Impulse and Drum Rack. I admire Impulse for its ease of use and flexibility. However, its bigger sibling Drum Rack is the one I find myself reaching for most often.
Drum Rack offers a powerful solution to drum programming and MIDI sequencing. This guide introduces the mighty Drum Rack and gives a basic overview of the device. It also provides some simple tips and workflow hacks which even seasoned Drum Rack users may find helpful. Let’s dive into it!
Drum Rack Interface
Live offers four different Racks: Audio Effect Racks, Instrument Racks, MIDI Effect Racks, and Drum Racks. If your familiar with these devices then the Drum Rack faceplate shouldn’t feel much different. It features the same “Show/Hide” controls along the left-hand side of the device. These buttons show and hide the Macro Controls, Chain List, and Devices. The Title Bar also features the same “Hot-Swap” and “Save” controls as all other Live devices.
Basics aside, Drum Racks have a slightly different layout and some special features optimized for creating drum kits. Let’s look at what Drum Racks offer.
Drum Rack Pad View
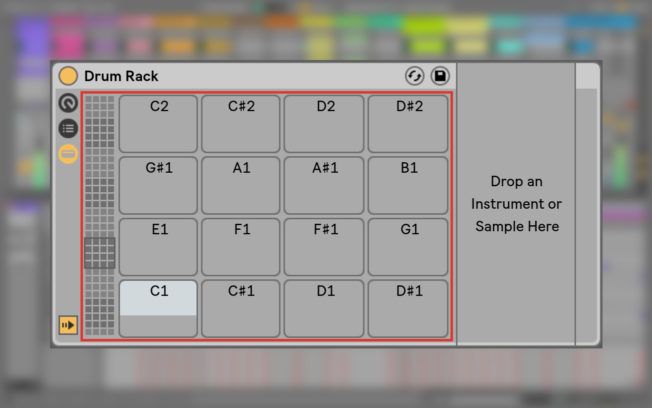
Unique to Drum Rack is a large grid of 16 empty pads. They offer an easy way to map and manipulate samples and devices. You can drop drum samples, instruments, and effects onto to them when creating your drum kit (i.e., a collection of drum sounds). Each pad is also assigned a MIDI note. Playing the MIDI note assigned to the pad will trigger the loaded sample. For example, if you drag and drop a kick drum sample onto the C1 pad, that MIDI note will playback the sample.
You’ll also notice a smaller grid of squares to the left of the pads. They represent the 128 available MIDI notes. Dragging the view selector up or down gives you access to groups of 16 pads. You can also use your computer keyboards up and down arrow keys. Also, there are 128 MIDI notes on a full MIDI keyboard. So, Drum Rack essentially allows us to map samples onto every note of the keyboard.
Furthermore, the Pad View excels as a performance interface. You can map pads to a controller and trigger them manually instead of drawing notes in the Note Editor.
Sample Playback
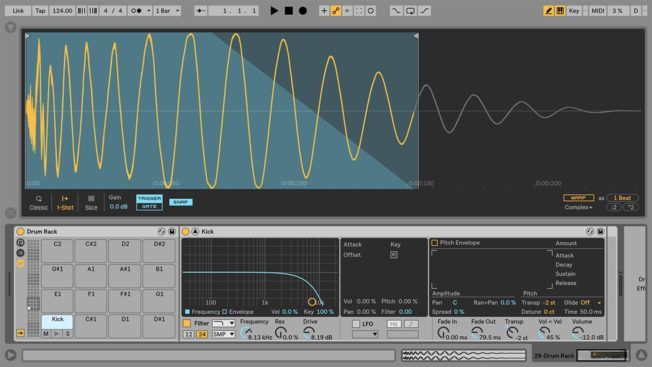
Double-clicking on a pad containing a sample will reveal its chain loaded with Live’s Simpler device. Dropping a sample to a pad will load Simpler ready to play or edit that sample. Simpler could be the subject of an article on its own, but I’ll give it a quick mention.
Simpler is an instrument that integrates a basic sampler with classic synthesizer controls. It features a volume envelope, pitch envelope, filter, LFO, warping options, and more. Simpler also includes some unique abilities inherited from Live’s clips. It is a versatile device for slicing, editing, and playing samples.
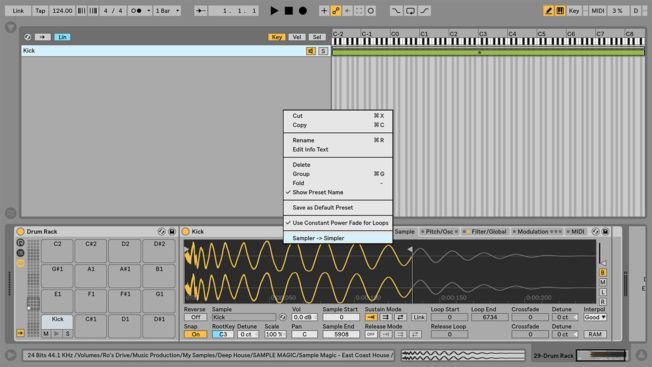
However, if you’d rather work with Live’s more advanced Sampler instrument, there’s an easy way to swap it. Right-click or Control-click on Simpler’s Title Bar and choose “Simpler->Sampler” from the context menu. This option turns Simpler into a Sampler and keeps any changes you’ve made to its controls!
Building Drum Kits
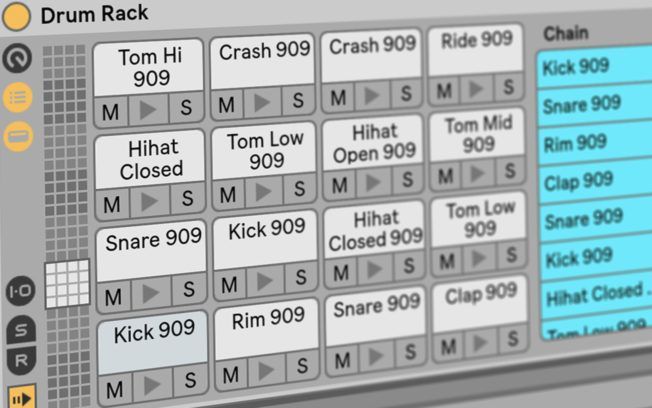
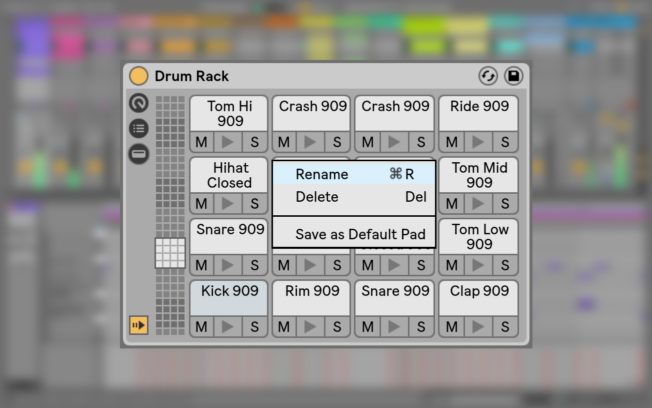
Let’s get back to the basics. One of my favorite Drum Rack uses is the ability to organize and save drum sample collections. To emphasize, a real drum kit contains a kick drum, a snare, some hi-hat cymbals, and some toms. This collection of drums forms the basis of the drum tracks in most modern music. Think of a Drum Rack as a virtual recreation of a real drum kit. What’s great is I can customize and save a variety of drum kits to my User Library using Drum Racks!
In the above below, I’ve collected some drum sounds that sound good together. To keep things organized, I’ve also renamed each drum pad. Renaming pads help me know which drum sound will trigger when I play specific MIDI notes. You can rename a pad by clicking on it and clicking Cmd+R [Mac] or Ctrl+R [PC]. Renaming pads also make it much easier to identify them when editing.
Drum Rack Chain List
Like the other Live Racks, Drum Racks feature a Chain List. You can create multiple parallel chains. However, Drum Rack chains process the input signal differently than other Racks. For example, each chain receives input from a single MIDI note rather than the same input signal for all chains.
Furthermore, each pad has its own chain. Each created chain has Volume and Pan sliders as well as Mute, Solo, and Hot-Swap buttons. You can do basic mixing, swap instruments, and insert audio effects to process the signal further. There are also some advanced functions such as choke groups, send effects, audio routing, and MIDI assignment controls.

Drum Rack Choke Groups
Clicking the “I/O” button on the lower left side of the device expands additional chain features such as the Choke chooser. This feature allows you to set a chain to one of sixteen choke groups. Any chain in the same choke group will silence the others when triggered.
For example, choke groups are useful for cutting off open hi-hats by triggering closed hi-hats. Choking hats this way is commonly used to simulate the behavior of real hats. For instance, a single hi-hat cymbal on a real drum kit can either be open OR closed. We will never hear it play a closed AND open hi-hat at the same time.

Send and Return Chains
Drum Racks can also contain up to six return chains of audio effects with their own send control. Clicking the “S” and “R” buttons on the lower left side of the device opens a return chains section at the bottom of the chain list.
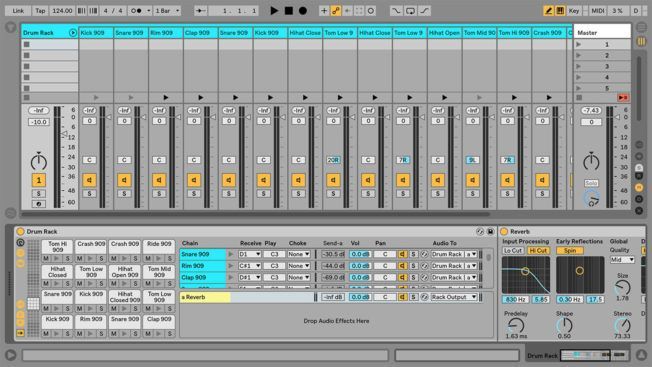
For example, dragging Live’s Reverb effect onto the area that says “Drop Audio Effects Here” will create a reverb return chain. You’ll then notice a “Send” slider appear next to the “Choke” chooser. If you don’t see this, click the “S” button to the left of the chain list. Increasing the send slider on any Drum Rack chain will send a copy of that sound through the respective return chain.
In the example below, I applied various amounts of reverb to different drum sounds. Powerful stuff!
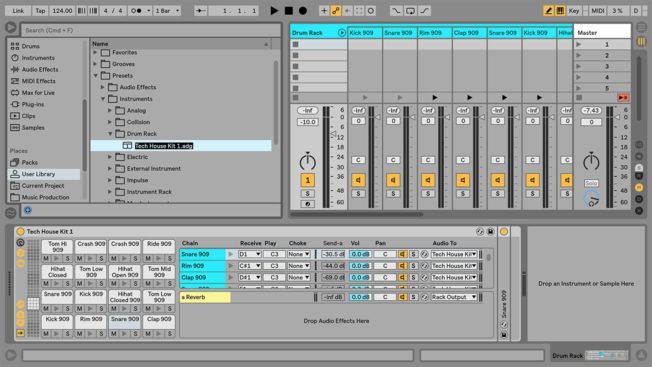
Saving Drum Rack Presets
Once you have a drum kit set up and customized, save it as a preset to use in other projects. The process is simple. Click the “floppy disk” button on the right corner of Drum Racks Title Bar. This action adds the Drum Rack to your User Library and offers a prompt to rename it. Let’s call this one “Tech House Kit 1.” Furthermore, you can find any of your saved Drum Rack presets in the following folder directory in Live’s Browser:
User Library>Presets>Instruments>Drum Rack
Bonus Drum Rack Tips
We’re just scratching the surface with this guide. Drum Rack is a very deep and powerful sampler instrument! For those of you who want to venture a bit beyond the basics, here are a few quick advanced tips.
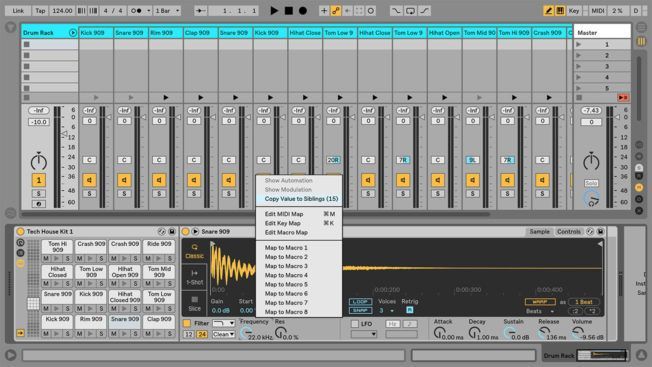
Copy Value to Siblings
Copy Value to Siblings is a huge time saver. This feature allows you to apply the same control settings to multiple instances of the same device in Drum Rack.
For example, say you have 50 pads loaded with various drum samples, and you want them to have the same volume level. It would be a daunting task to adjust the volume for every chain. Well, the Copy Values to Siblings feature saves the day by allowing you to change the same value for each device at once. Right-click any control on any device loaded in Drum Rack and choose Copy Value to Siblings from the context menu.
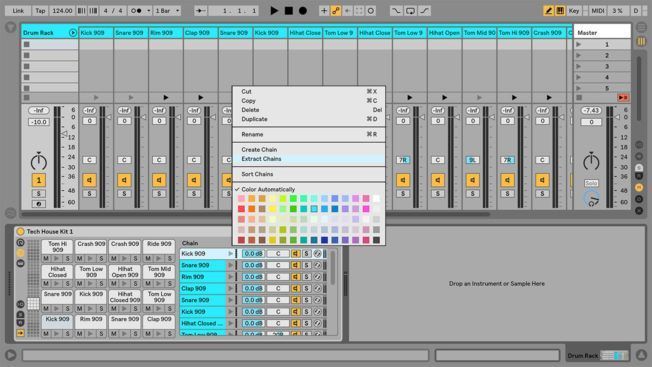
Extracting Chains
One of the quickest ways to kick-start a new tune is to load Drum Rack and start banging in some beats. This approach is fast, and it allows you to see every drum note in one place for easy editing. However, keeping all your drum elements combined in a single track is restrictive. It doesn’t allow as much control as it does when each element has its own track.
Fortunately, Live’s “Extract Chains” feature lets us enjoy the best of both worlds. Extracting chains from Drum Rack is an excellent way to move each drum element to a dedicated track after you’ve developed your beat foundation.
Start by right-clicking the chain you wish to extract and choosing “Extract Chains” from the context menu. Live will create a new track with a new set of MIDI clips containing only the notes from that chain.
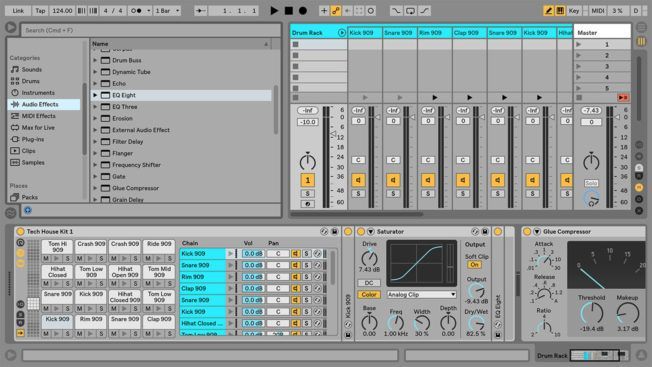
Effects Processing
Having separate chains for Drum Rack pads makes it easy to process each sound with different effects! For example, I’ve added Live’s Saturator to my kick sample in the image below. I ONLY want to affect the kick, so I will drag and drop Saturator from the Browser onto the kick drum pad. This action will insert Saturator directly after Simpler. I can also repeat this step to add other effects such as an EQ, compression, etc. However, if you want to process the entire Drum Rack, then drag and drop effects after the device.
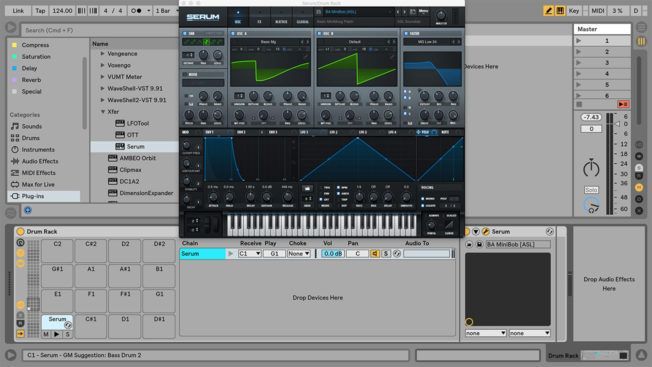
Adding Samples and Instruments
Drum Racks are not restricted to only drum samples. Feel free to drop in ANY available sample. For example drop in vocal chops, synth hits, bass one-shots, and anything else. You can also drop in a synthesizer plugin, other instruments, or an Instrument Rack onto a drum pad!
Here, I’ve dropped XFER’s Serum synthesizer plugin onto a drum pad loaded with a bass presets. In its default state, an instrument will play a C3 note when triggered from any Drum Rack pad. However, you can change which MIDI note will trigger the pad. First, show the chain list by clicking the “I/O” button. Second, change the “Play Note” setting to whatever pitch you want your instrument to play. For example, I’ve assigned Serum to play a G1 note.
Conclusion
You’re now armed with enough knowledge to start creating and saving your own drum kits with Live’s Drum Rack. For those of you who already know the basics, I hope the bonus tips have inspired you to dig a bit deeper into Drum Rack’s advanced capabilities.

Turn your passion for music into a Profession: Learn more about our Music School Programs!
MORE ARTICLES FROM THE ICON BLOG


FIND YOUR SOUND, HONE YOUR CRAFT:
Are you ready to turn music into a career? ICON prepares students to become music producers, composers, performers, recording artists, professional DJs, and entrepreneurs in the entertainment industry. Click below to get information about our award-winning programs: