Icon Instructor Paul Laski introduces you to Ableton Live’s Auto Pan effect and demonstrates how to use the device in creative ways.
Ableton Live Auto Pan
Ableton Live’s Auto Pan effect is, in my opinion, one of Live’s most underrated audio devices. While not incredibly flashy on the surface, there is a lot more to this little modulation effect than meets the eye (and ear)! Let’s examine its intended use, and then look at ways to “abuse” the device for more interesting rhythmic effects.
Intended Uses
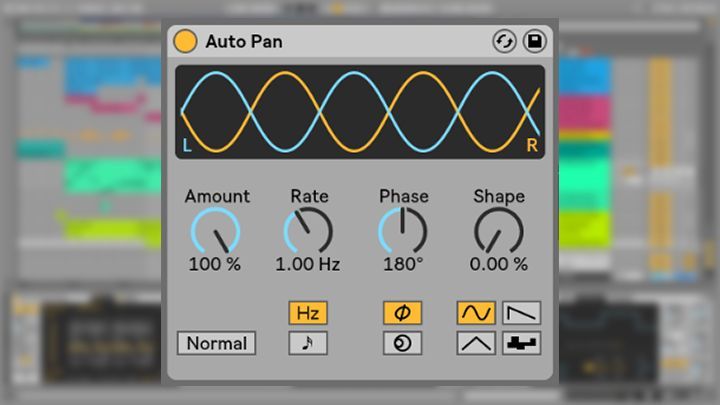
Auto Pan is a versitle tool that creates stereo panning effects. Auto Pan achieves this with two separate LFOs which modulate the volume of the left and right channels independently. In its default configuration, Auto Pan uses two LFO sine waves and places them both exactly 180 degrees out of phase. The result increases the volume on the left channel while decreasing the volume on the right channel and vice versa. So what sounds like a pan pot moving left and right is actually LFO modulation of volume levels in opposite directions. Additionally, the Amount control determines the intensity, or depth, of the “panning” effect.
Tremolo Effects
OK, so we can use this device for stereo panning effects, simple enough. But now that we’re armed with this knowledge, we can start to abuse Auto Pan’s capabilities a bit.
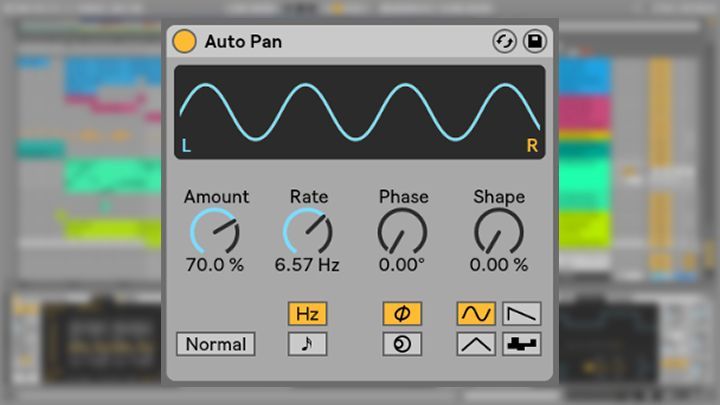
For starters, if we turn the Phase control all the way down to 0 degrees (or, conversely, all the way up to 360 degrees), you’ll see that the two LFO phases align with each other. In this scenario, the single is LFO modulating the volume of both left and right channels simultaneously. In other words, we’re dealing with a full-on volume LFO. Start turning up the Amount control, and perhaps the Rate control a little bit to hear a tremolo effect. I like to use Auto Pan this way on white noise sweeps and riser sounds. I often automate the Rate control as well to create a “flutter” effect on the white noise. Also, turning the Phase control back up will create a stereo “flutter” effect.
Volume Gate Effects
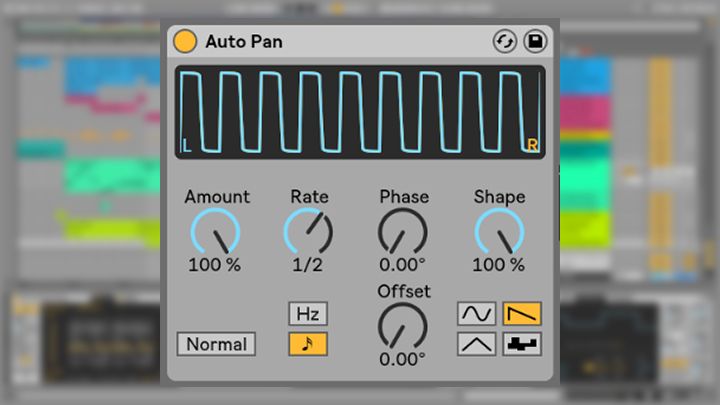
Things begin getting a bit more interesting when we play with other controls while the two waveforms are in phase. For example, you can create fast, tempo-synced volume gate effects.
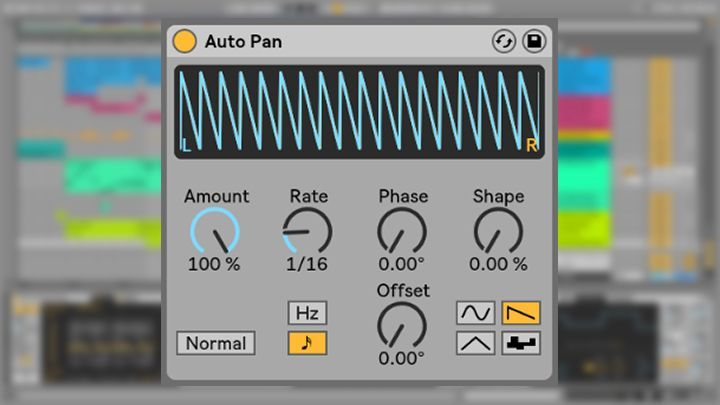
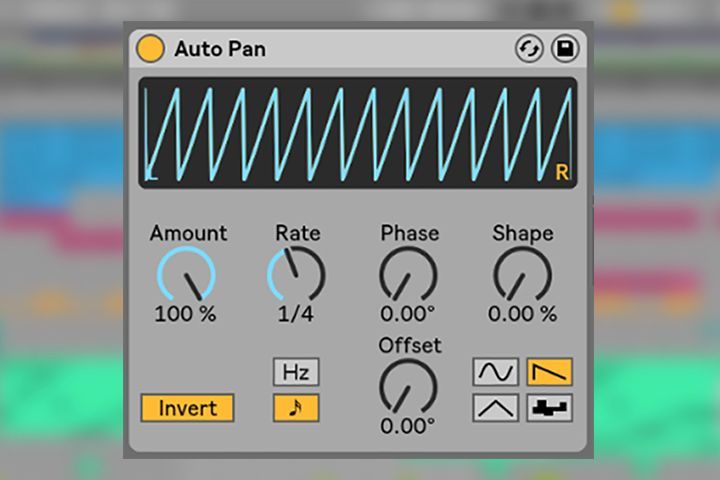
In the example above, I’ve changed the LFO waveform to a sawtooth and set the LFO Rate Type to “tempo sync” mode by clicking the small notehead button (under the Hz button). This allows the LFO to lock to the tempo of the song, rather than run in Hertz (cycles per second). The Rate control is also set to 16th notes, giving me a fast, trance-like, gating effect – perfect for pad sounds! You can also adjust the Shape control to “square off” the LFO waveform to make the volume effect more rigid if desired.
Sidechaining with Auto Pan
As a final tip, you can also use Auto Pan as an alternative to sidechain compression. This technique allows you to quickly duck the volume of any sound in your mix. This technique also stimulates the same effect you might get with plugins like Xfer’s LFO Tool or Nicky Romero’s Kickstart . This approach eliminates the hassle of routing audio and configuring a compressors threshold, attack, and release times. Furthermore, you don’t have to shell out hard-earned cash for a new sidechaining plugin!
Setting up Auto Pan to function like a sidechain compressor is also very simple. First, set the LFO Waveform button to sawtooth so that the volume ducking recovers faster. Second, toggle the Normal button to invert the phase so that the volume attenuates quickly and then ramps up. Third, adjust the Phase control to 0 degrees so that the LFOs are in phase and there is no stereo movement. Forth, set the LFO Rate Type to “tempo sync” mode and then adjust the Rate control to the quarter note. Lastly, increase the Amount control to apply the effect.
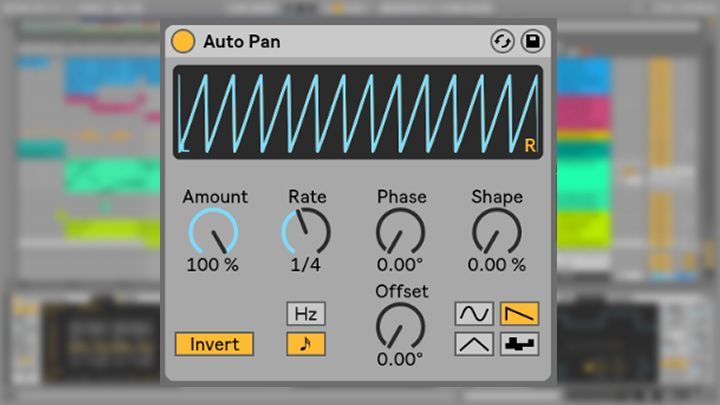
These settings create a fast, responsive volume LFO effect that ducks the volume at the beginning of each quarter note. This is where the kick drum hits in most house, techno, progressive, and trance music. Note, using Auto Pan this way only works with “four on the floor” kick drum patterns.
Furthermore, play with the Shape control to determine how abrupt or gradual the effect reacts. As mentioned above, the Amount control will control the intensity of the effect. If desired, you can also soften the movement and avoid those infamous sidechain compression “clicks” by using a sine LFO waveform instead of a saw. Because of its more rounded shape, you won’t hear any “clicking” as the volume drops abruptly. Moreover, you may need to make some small adjustments to get the sound sitting rhythmically correct with the kick drum.
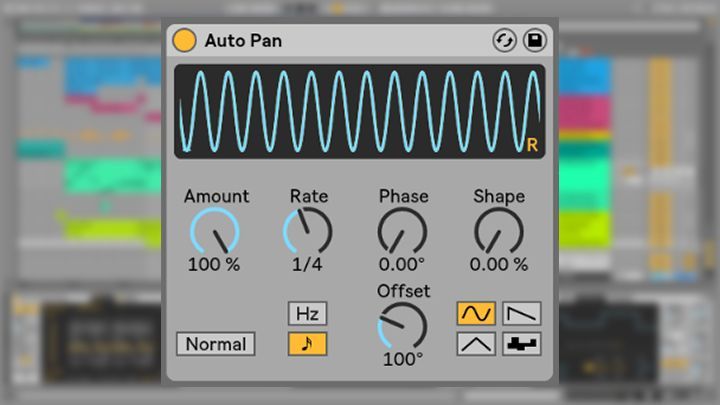
In the image above, you can see the Invert button is set back to Normal, and the Offset control has been adjusted. Offsetting the LFOs when they are tempo-synced determines where the waveform cycle starts its movement. I find that a value of about 100 degrees works well with a sinewave, but feel free to experiment with slightly different settings. Moreover, varying the Offset amount also introduces a subtle amount of “swing” to the sidechain compression effect.
Auto Pan Wrap Up
All in all, Auto Pan is a terrific effect for adding stereo panning AND volume movement to otherwise static sounds. I hope I’ve inspired you to take a deeper dive into one of Live’s most overlooked devices. Happy Auto Panning!
Turn your passion for music into a Profession: Learn more about our Music School Programs!
Join our Newsletter
Get the the latest music industry insights, invites to exclusive events and workshops, and artist spotlights straight in your email.
MORE ARTICLES FROM THE ICON BLOG


FIND YOUR SOUND, HONE YOUR CRAFT:
Are you ready to turn music into a career? ICON prepares students to become music producers, composers, performers, recording artists, professional DJs, and entrepreneurs in the entertainment industry. Click below to get information about our award-winning programs: